VR Teleop Setup (PICO)#
This page covers the one-time hardware and software setup for PICO VR whole-body teleoperation. After completing these steps, proceed to the ZMQ Manager tutorial to run teleop in sim or on real hardware.
Required Hardware#
2x PICO motion trackers (strapped to ankles)
A high-speed, low-latency Wi-Fi connection; teleoperation performance is heavily dependent on network quality.
Step 1: Install XRoboToolkit#
XRoboToolkit consists of a PC service (running on your workstation) and a PICO app (running on the headset) that streams body-tracking data.
PC Service#
The PC service must be installed and running on your workstation before the PICO can connect.
Ubuntu 22.04 (x86_64 workstation):
wget https://github.com/XR-Robotics/XRoboToolkit-PC-Service/releases/download/v1.0.0/XRoboToolkit_PC_Service_1.0.0_ubuntu_22.04_amd64.deb
sudo dpkg -i XRoboToolkit_PC_Service_1.0.0_ubuntu_22.04_amd64.deb
Ubuntu 24.04 (x86_64 workstation):
wget https://github.com/XR-Robotics/XRoboToolkit-PC-Service/releases/download/v1.0.0/XRoboToolkit_PC_Service_1.0.0_ubuntu_24.04_amd64.deb
sudo dpkg -i XRoboToolkit_PC_Service_1.0.0_ubuntu_24.04_amd64.deb
Jetson (aarch64, onboard):
sudo dpkg -i gear_sonic_deploy/thirdparty/roboticsservice_1.0.0.0_arm64.deb
See XRoboToolkit-PC-Service releases for other platforms or newer versions.
PICO App#
Wear the PICO headset to begin the setup and installation process.
Complete the quick setup on PICO.
Make sure the PICO is connected to Wi-Fi.
Open the browser application in the PICO.
Type “xrobotoolkit” in the search bar and select the GitHub page XR-Robotics.

Make sure Developer Mode is enabled (Settings → Developer).
[INSIDE PICO] Scroll down in the GitHub page until you see the APK download option and click with the PICO trigger to download it.
Tip
Download XRoboToolkit-PICO-1.1.1.apk on PICO using the browser. (Other Versions)
[INSIDE PICO] Open the manage downloads option on the top right section of the browser page and click to open the
XRoboToolkit-PICO-1.1.1.apkdownload.[INSIDE PICO] Select Install — the application will appear in the Unknown section of your library.
Step 2: Motion Tracker Setup#
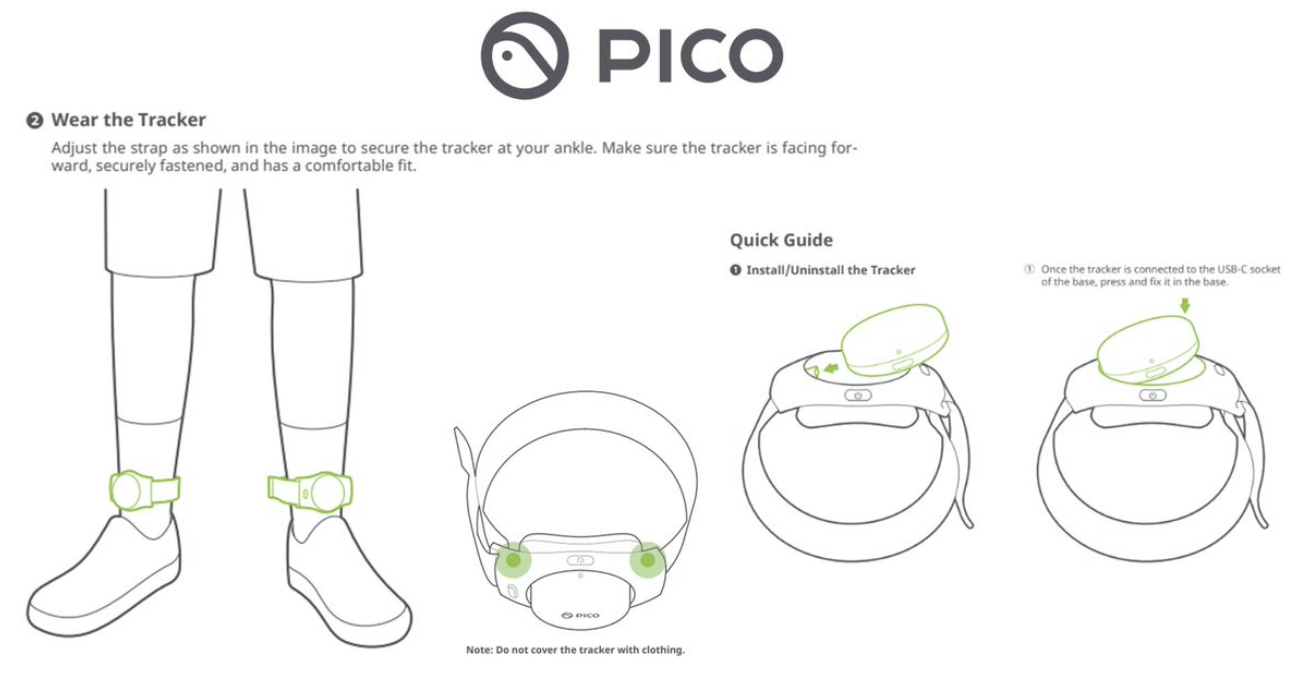
Strap one PICO motion tracker to your left ankle and one to your right ankle. Scrunch down any baggy clothing so the trackers are visible. Make sure the side with the light indicator faces up.
Go to PICO settings. In the menu on the left, scroll down to the last option: “Developer”. Make sure “Safeguard” is turned off.
If the Developer option is not active, tap on “Software” until it appears.
Click the Wi-Fi icon in the PICO menu. A picture of the headset will appear. Above the headset, there will be a small circular logo for the motion trackers. If there is no logo, open the “Motion Tracker” app itself.
Headset and 2 controllers will populate — select Motion Tracker (small circle).
Next to each tracker, there is an “i” icon. Click on this and unpair all trackers.
Once all trackers are cleared, click the “Pair” button in the top right corner.
Press and hold the button on the top of each motion tracker for 6 seconds. Once in pairing mode, the lights will flash red and blue.
Motion Tracker Calibration#
Wear the PICO headset over your eyes.
Press the blue “Calibrate” button and follow the two calibration sequences:
Sequence 1: Stand stiff with the handheld controllers down by your sides.
Sequence 2: Look down at the foot motion trackers until the headset cameras recognize them.
Once calibrated, wear the PICO headset around your forehead (ensuring PICO faces forward to continue detecting motion trackers).
Step 3: Install the PICO Teleop Environment#
From the repo root:
bash install_scripts/install_pico.sh
This creates a .venv_teleop virtual environment (Python 3.10) that includes:
teleopextra (ZMQ, Pinocchio, PyVista)simextra (MuJoCo, tyro)XRoboToolkit SDK
Unitree SDK2 Python bindings
Activate it with:
source .venv_teleop/bin/activate # prompt: (gear_sonic_teleop)
Step 4: Connect the PICO to Your Workstation#
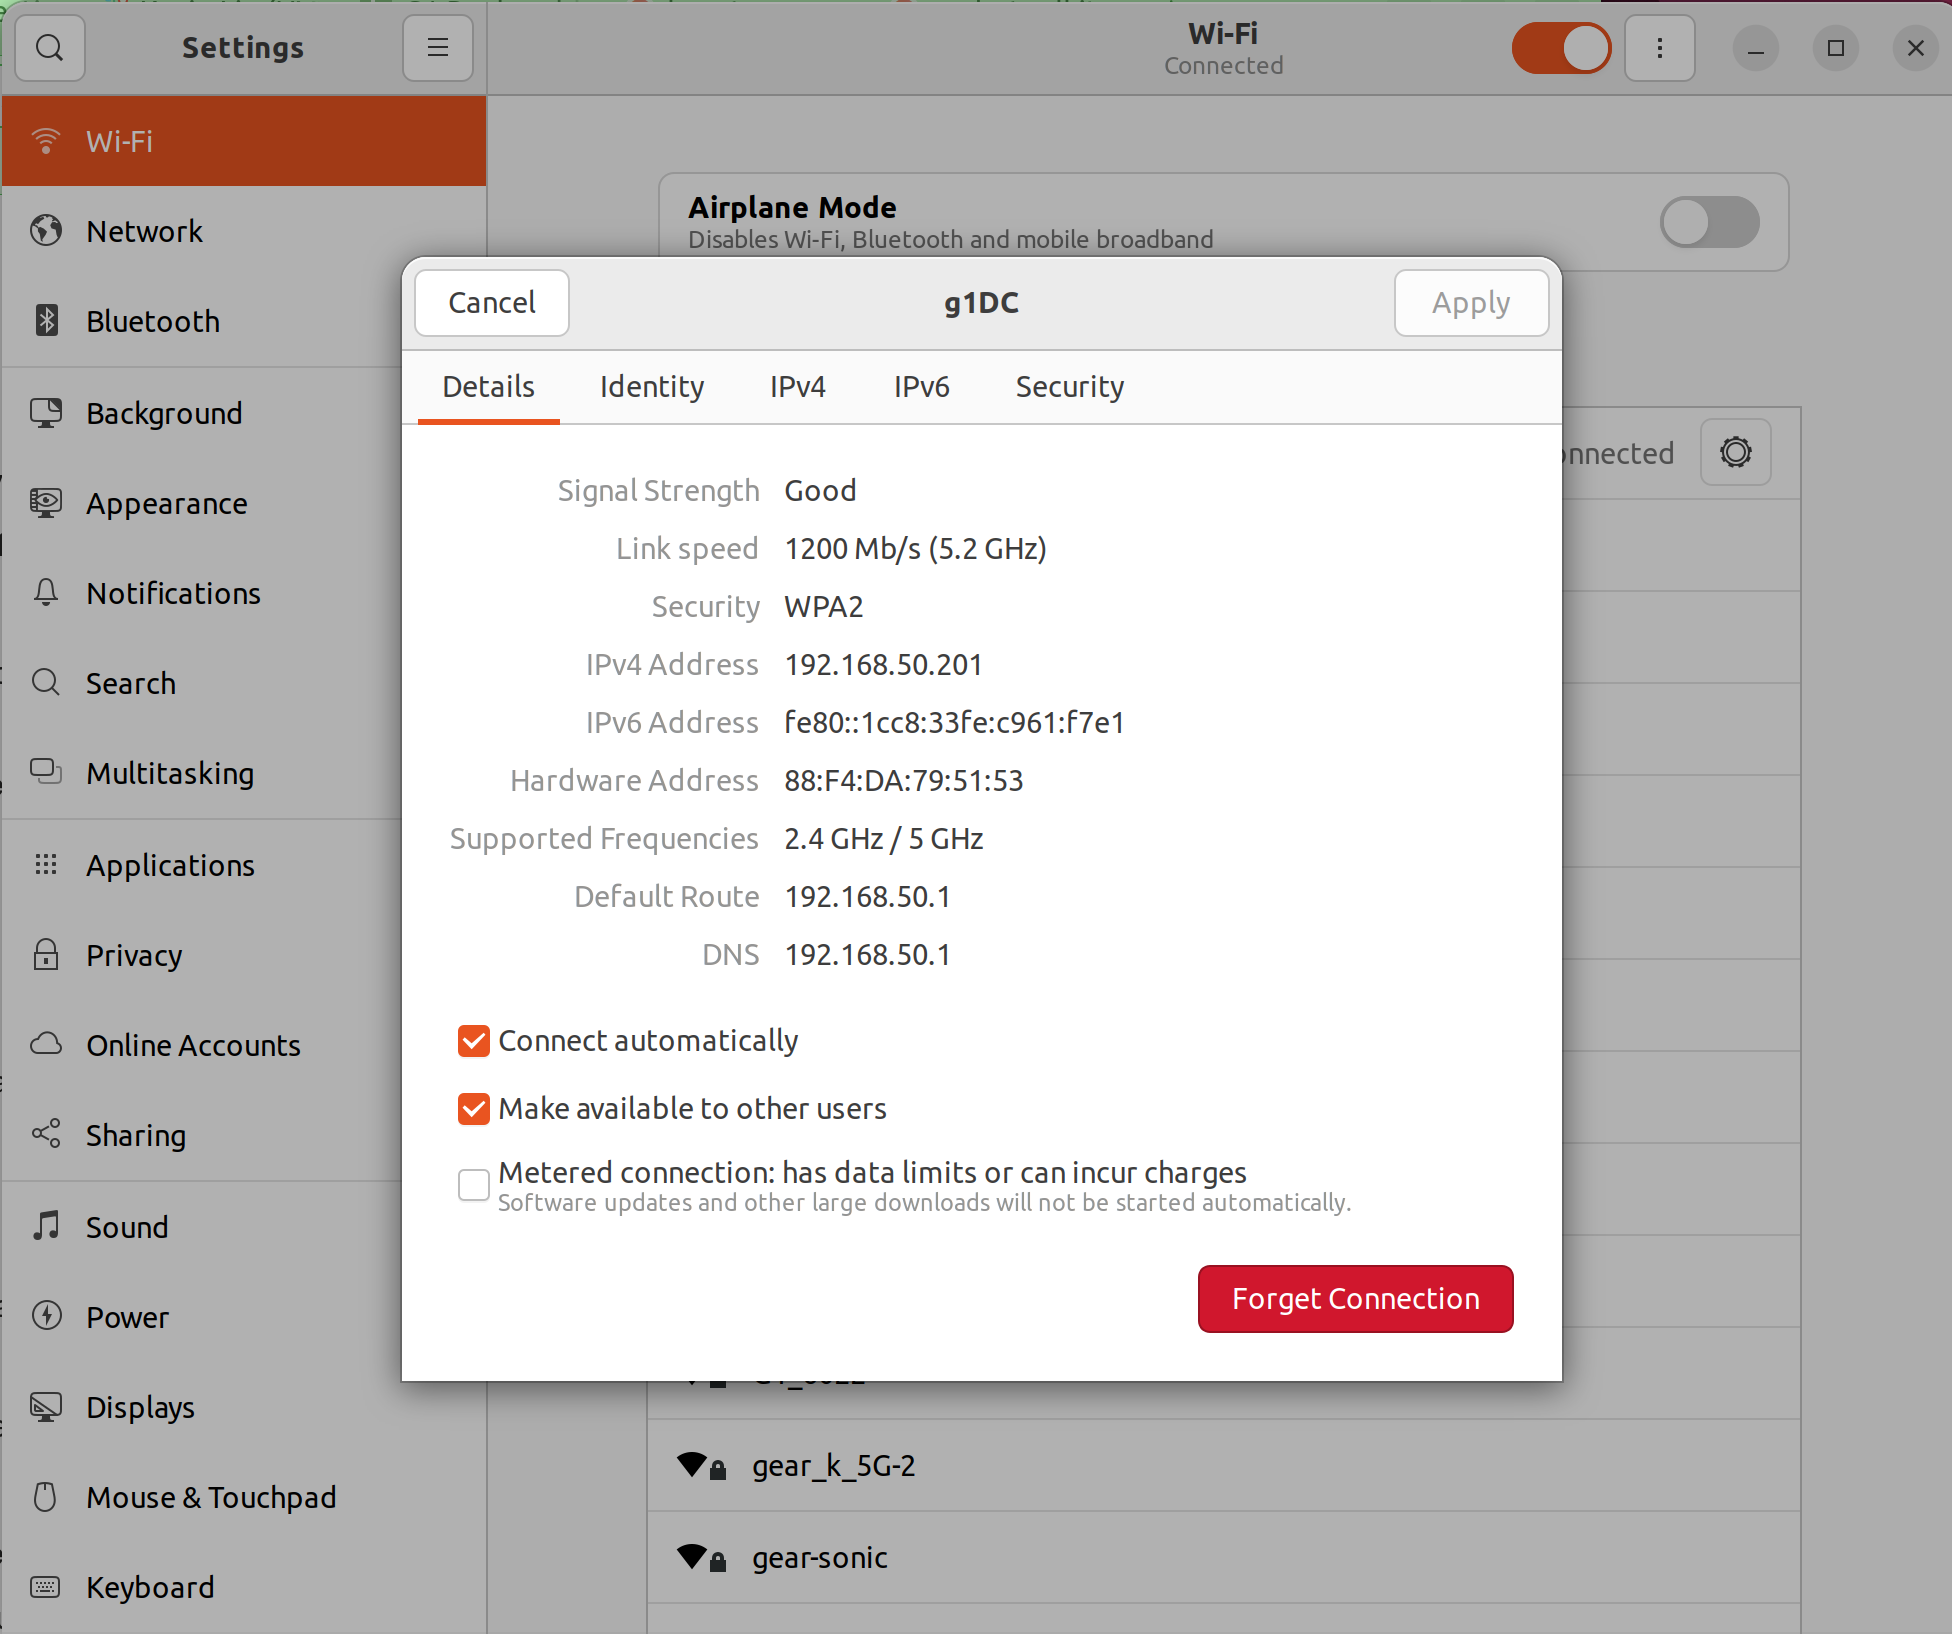
Open the Wi-Fi settings on both the laptop/PC and PICO and ensure they are on the same Wi-Fi network. Take note of the Wi-Fi IPv4 address.
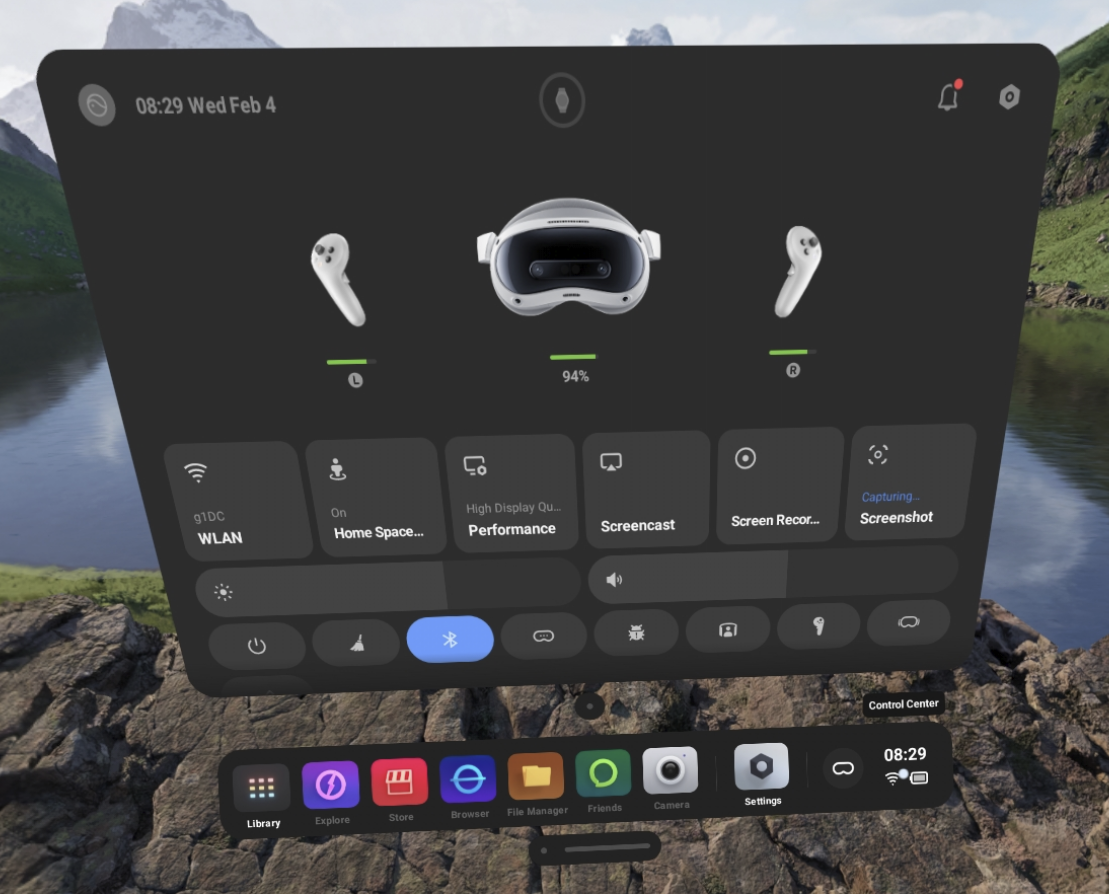
To find the PICO’s Wi-Fi, select the control center on the bottom right of the menu.
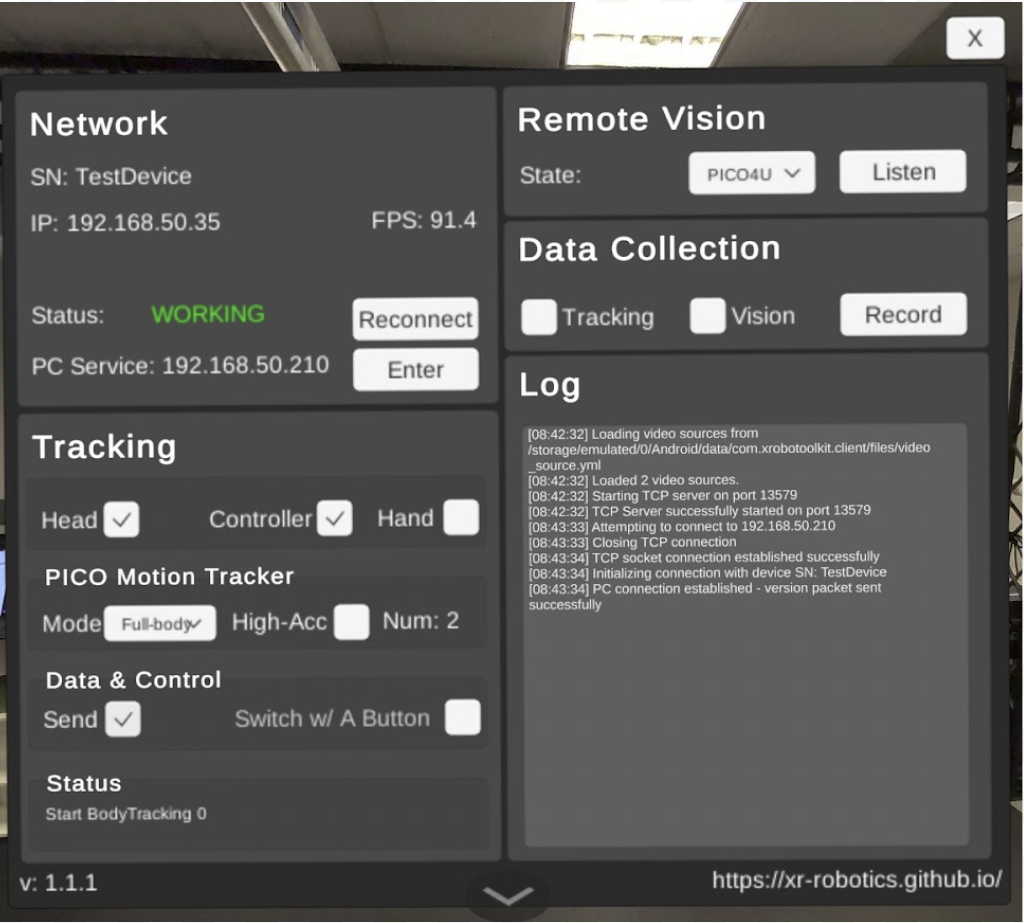
Open the XRoboToolKit application. Enter the IP address of the laptop by clicking “Enter” next to “PC Service:”. You will know it is properly connected if WORKING appears next to “Status:”.
If your IP address is already inputted, select “Reconnect” where it says “Status:” in the Network section.
Make sure the following boxes are ticked as shown in the picture below:
“Head” and “Controller” under the “Tracking” section.
For Data/Control, make sure to select the “Send” button.
For “Pico Motion Tracker” make sure to select “Full body”.
Next Steps#
Your PICO hardware and software are now ready. Proceed to the ZMQ Manager (zmq_manager) tutorial to run whole-body teleoperation in simulation or on the real robot.