Recording Demonstrations#
You can either record your own demonstrations by teleoperating a robot in Isaac Lab or use the provided datasets. See the following sections on how to record demonstrations for the Franka robot arm (using a SpaceMouse) and the GR1 humanoid (using an Apple Vision Pro). For more details on teleoperation and imitation learning in Isaac Lab, see the Isaac Lab documentation.
Visit Download Datasets to learn how to download HDF5 files for each task containing pre-recorded demonstrations.
Note
All tasks are run with the Isaac Lab physics simulation in CPU mode. We found it to be more stable for the Isaac Lab 2.1.0 release (which we support in mindmap). These stability issues are fixed in newer versions of Isaac Lab.
Recording Franka Demonstrations#
For recording demonstrations for the Franka robot arm, we support the SpaceMouse as a teleoperation device.
To record demonstrations using the SpaceMouse and generate additional demonstrations using Isaac Lab Mimic, you need to:
Connect the SpaceMouse to your computer first, then enter the interactive docker container.
Inside the interactive docker container, navigate to the Isaac Lab submodule directory:
cd ../submodules/IsaacLab
Record demonstrations by teleoperating the robot with the SpaceMouse as instructed on the console after running the following command (find additional information here). The recorded demonstrations will be stored in the HDF5 dataset file.
./isaaclab.sh -p scripts/tools/record_demos.py \
    --task Isaac-Stack-Cube-Franka-IK-Rel-v0 \
    --dataset_file <RECORD_HDF5_FILE_PATH> \
    --num_demos <NUMBER_OF_DEMOS_TO_RECORD> \
    --teleop_device spacemouse  \
    --enable_pinocchio \
    --device cpu
./isaaclab.sh -p scripts/tools/record_demos.py \
    --task Isaac-Mug-in-Drawer-Franka-v0 \
    --dataset_file <RECORD_HDF5_FILE_PATH> \
    --num_demos <NUMBER_OF_DEMOS_TO_RECORD> \
    --teleop_device spacemouse  \
    --enable_cameras \
    --enable_pinocchio \
    --device cpu
Note
If the SpaceMouse is not detected follow the instructions in the Isaac Lab teleoperation documentation. Additionally, left-clicking inside the rendered Isaac Lab scene can help activate teleoperation if it does not start working immediately.
Note
To complete a demonstration you need to fullfill the success criteria of the task.
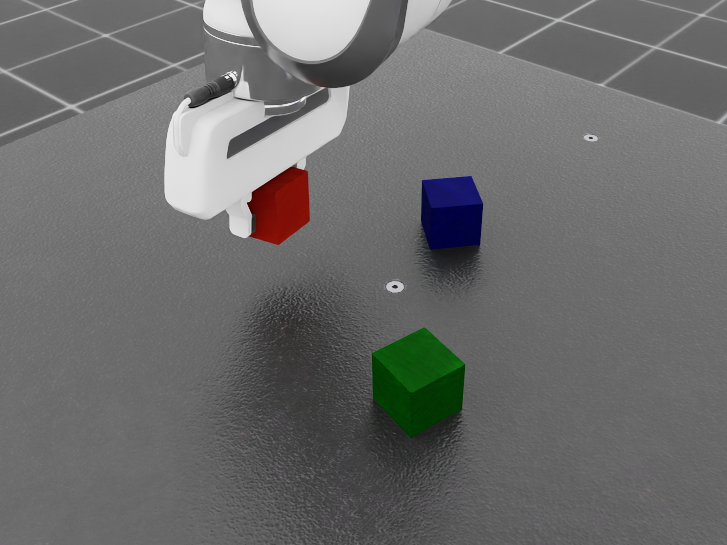
For Cube Stacking the order of the stacked cubes should be blue (bottom), red (middle), green (top).
For Mug in Drawer the mug should be placed in the drawer containing other mugs and the gripper should be opened.
The recorded demonstrations need to be segmented into subtasks before the next step. This is done by manual annotation, following the instructions printed to the terminal after running the following command:
./isaaclab.sh -p scripts/imitation_learning/isaaclab_mimic/annotate_demos.py \
    --task Isaac-Stack-Cube-Franka-IK-Rel-Mimic-v0 \
    --input_file <RECORD_HDF5_FILE_PATH> \
    --output_file <ANNOTATED_HDF5_FILE_PATH> \
    --enable_pinocchio \
    --device cpu
./isaaclab.sh -p scripts/imitation_learning/isaaclab_mimic/annotate_demos.py \
    --task Isaac-Mug-in-Drawer-Franka-Mimic-v0 \
    --input_file <RECORD_HDF5_FILE_PATH> \
    --output_file <ANNOTATED_HDF5_FILE_PATH> \
    --enable_cameras \
    --enable_pinocchio \
    --device cpu
Generate additional demonstrations using Isaac Lab Mimic from the annotated demonstrations (find more detail in the Generating additional demonstrations section of the Isaac Lab Mimic documentation).
./isaaclab.sh -p scripts/imitation_learning/isaaclab_mimic/generate_dataset.py \
    --task Isaac-Stack-Cube-Franka-IK-Rel-Mimic-v0 \
    --input_file <ANNOTATED_HDF5_FILE_PATH> \
    --output_file <GENERATED_HDF5_FILE_PATH> \
    --num_envs 10 \
    --generation_num_trials <NUMBER_OF_DEMOS_TO_GENERATE> \
    --headless \
    --device cpu
./isaaclab.sh -p scripts/imitation_learning/isaaclab_mimic/generate_dataset.py \
    --task Isaac-Mug-in-Drawer-Franka-Mimic-v0 \
    --input_file <ANNOTATED_HDF5_FILE_PATH> \
    --output_file <GENERATED_HDF5_FILE_PATH> \
    --num_envs 10 \
    --generation_num_trials <NUMBER_OF_DEMOS_TO_GENERATE> \
    --enable_cameras \
    --headless \
    --device cpu
After completing the above steps, you end up with an HDF5 file containing <NUMBER_OF_DEMOS_TO_GENERATE> demonstrations.
This file will be needed for data generation and closed loop evaluation.
Recording GR1 Demonstrations#
For recording demonstrations for the GR1 humanoid, we support the Apple Vision Pro as a teleoperation device. Find additional details on recording demonstrations for the GR1 humanoid in the Isaac Lab humanoid data generation documentation.
Note
Our GR1 mindmap tasks require two separate Isaac Lab Mimic tasks each, one for grasping the target object with the left and one for the right hand. The reason for this is that Isaac Lab Mimic requires specifying a subtask such as grasping for a specific hand. Therefore, we record demonstrations for each hand separately and combine them into a single HDF5 file after the Isaac Lab Mimic generation.
To record demonstrations using the Apple Vision Pro and generate additional demonstrations using Isaac Lab Mimic, you need to:
Install the Isaac XR Teleop Sample Client App on your Apple Vision Pro.
Start the CloudXR Runtime Docker container on your Isaac Lab workstation (corresponds to option 2 from the CloudXR Runtime documentation):
cd submodules/IsaacLab &&
docker run -it --rm --name cloudxr-runtime \
    --user $(id -u):$(id -g) \
    --runtime=nvidia \
    -e "ACCEPT_EULA=Y" \
    --mount type=bind,src=$(pwd)/openxr,dst=/openxr \
    -p 48010:48010 \
    -p 47998:47998/udp \
    -p 47999:47999/udp \
    -p 48000:48000/udp \
    -p 48005:48005/udp \
    -p 48008:48008/udp \
    -p 48012:48012/udp \
    nvcr.io/nvidia/cloudxr-runtime:0.1.0-isaac
In a separate terminal, start the interactive docker container and navigate to the Isaac Lab submodule directory:
cd ../submodules/IsaacLab
Start the Isaac Lab record script inside the terminal where you started the interactive docker container:
./isaaclab.sh -p scripts/tools/record_demos.py \
    --task Isaac-Drill-In-Box-GR1T2-Left-v0 \
    --dataset_file <RECORD_HDF5_FILE_PATH> \
    --num_demos <NUMBER_OF_DEMOS_TO_RECORD> \
    --teleop_device dualhandtracking_abs \
    --enable_pinocchio  \
    --device cpu
./isaaclab.sh -p scripts/tools/record_demos.py \
    --task Isaac-Drill-In-Box-GR1T2-Right-v0 \
    --dataset_file <RECORD_HDF5_FILE_PATH> \
    --num_demos <NUMBER_OF_DEMOS_TO_RECORD> \
    --teleop_device dualhandtracking_abs \
    --enable_pinocchio  \
    --device cpu
./isaaclab.sh -p scripts/tools/record_demos.py \
    --task Isaac-Stick-In-Bin-GR1T2-Left-v0 \
    --dataset_file <RECORD_HDF5_FILE_PATH> \
    --num_demos <NUMBER_OF_DEMOS_TO_RECORD> \
    --teleop_device dualhandtracking_abs \
    --enable_pinocchio  \
    --device cpu
./isaaclab.sh -p scripts/tools/record_demos.py \
    --task Isaac-Stick-In-Bin-GR1T2-Right-v0 \
    --dataset_file <RECORD_HDF5_FILE_PATH> \
    --num_demos <NUMBER_OF_DEMOS_TO_RECORD> \
    --teleop_device dualhandtracking_abs \
    --enable_pinocchio  \
    --device cpu
Note
In mindmap we additionally track the head yaw from the Apple Vision Pro and retarget it to the robot’s head yaw.
Note
Due to an issue that prevents running teleoperation together with enabled Isaac Lab cameras, you need to manually comment cameras in the environment configurations.
Find the robot_pov_cam and external_cam cameras being configured in
drill_in_box_gr1_env_cfg.py and
stick_in_bin_gr1_env_cfg.py.
With the Isaac Lab record script and CloudXR Runtime running, locate and click the “Start AR” button in the Isaac Lab UI (refer to the Isaac Lab/CloudXR documentation).
Connect the Apple Vision Pro to your Isaac Lab workstation and start teleoperating (see the Isaac Lab/Apple Vision Pro teleoperation documentation).
Note
To complete a demonstration you need to fullfill the success criteria of the task.
For Drill in Box the power drill should be placed in the open box.
For Stick in Bin the stick should be placed in the bin.
In both tasks, after placing the object, you must also lift the robot’s grasping hand up and away from the box or bin to finish the demonstration.
Annotate the subtasks of the recorded demonstrations by following the instructions printed to the terminal after running the following command (for more details, see this).
./isaaclab.sh -p scripts/imitation_learning/isaaclab_mimic/annotate_demos.py \
    --task Isaac-Drill-In-Box-GR1T2-Left-Mimic-v0 \
    --input_file <RECORD_HDF5_FILE_PATH> \
    --output_file <ANNOTATED_HDF5_FILE_PATH> \
    --enable_pinocchio  \
    --device cpu
./isaaclab.sh -p scripts/imitation_learning/isaaclab_mimic/annotate_demos.py \
    --task Isaac-Drill-In-Box-GR1T2-Right-Mimic-v0 \
    --input_file <RECORD_HDF5_FILE_PATH> \
    --output_file <ANNOTATED_HDF5_FILE_PATH> \
    --enable_pinocchio  \
    --device cpu
./isaaclab.sh -p scripts/imitation_learning/isaaclab_mimic/annotate_demos.py \
    --task Isaac-Stick-In-Bin-GR1T2-Left-Mimic-v0 \
    --input_file <RECORD_HDF5_FILE_PATH> \
    --output_file <ANNOTATED_HDF5_FILE_PATH> \
    --enable_pinocchio  \
    --device cpu
./isaaclab.sh -p scripts/imitation_learning/isaaclab_mimic/annotate_demos.py \
    --task Isaac-Stick-In-Bin-GR1T2-Right-Mimic-v0 \
    --input_file <RECORD_HDF5_FILE_PATH> \
    --output_file <ANNOTATED_HDF5_FILE_PATH> \
    --enable_pinocchio  \
    --device cpu
Generate additional demonstrations using Isaac Lab Mimic (for more details, see Generate the dataset section of the Isaac Lab Mimic documentation):
./isaaclab.sh -p scripts/imitation_learning/isaaclab_mimic/generate_dataset.py \
    --task Isaac-Drill-In-Box-GR1T2-Left-Mimic-v0 \
    --input_file <ANNOTATED_HDF5_FILE_PATH> \
    --output_file <GENERATED_HDF5_FILE_PATH> \
    --enable_pinocchio \
    --num_envs 10 \
    --generation_num_trials <NUMBER_OF_DEMOS_TO_GENERATE> \
    --headless \
    --device cpu
./isaaclab.sh -p scripts/imitation_learning/isaaclab_mimic/generate_dataset.py \
    --task Isaac-Drill-In-Box-GR1T2-Right-Mimic-v0 \
    --input_file <ANNOTATED_HDF5_FILE_PATH> \
    --output_file <GENERATED_HDF5_FILE_PATH> \
    --enable_pinocchio \
    --num_envs 10 \
    --generation_num_trials <NUMBER_OF_DEMOS_TO_GENERATE> \
    --headless \
    --device cpu
./isaaclab.sh -p scripts/imitation_learning/isaaclab_mimic/generate_dataset.py \
    --task Isaac-Stick-In-Bin-GR1T2-Left-Mimic-v0 \
    --input_file <ANNOTATED_HDF5_FILE_PATH> \
    --output_file <GENERATED_HDF5_FILE_PATH> \
    --enable_pinocchio \
    --num_envs 10 \
    --generation_num_trials <NUMBER_OF_DEMOS_TO_GENERATE> \
    --headless \
    --device cpu
./isaaclab.sh -p scripts/imitation_learning/isaaclab_mimic/generate_dataset.py \
    --task Isaac-Stick-In-Bin-GR1T2-Right-Mimic-v0 \
    --input_file <ANNOTATED_HDF5_FILE_PATH> \
    --output_file <GENERATED_HDF5_FILE_PATH> \
    --enable_pinocchio \
    --num_envs 10 \
    --generation_num_trials <NUMBER_OF_DEMOS_TO_GENERATE> \
    --headless \
    --device cpu
Combine the demonstrations for the left and right hand into a single HDF5 file:
python /workspaces/mindmap/mindmap/scripts/merge_hdf5_files.py \
    --inputs <LEFT_GENERATED_HDF5_FILE_PATH> <RIGHT_GENERATED_HDF5_FILE_PATH> \
    --output <COMBINED_HDF5_FILE_PATH>
After completing the above steps, you end up with an HDF5 file containing <NUMBER_OF_DEMOS_TO_GENERATE> demonstrations for each hand.
This file will be needed for data generation and closed loop evaluation.